Category Archives: recipes

Rainbow Sherbet Angel Food Cake

This year, for Easter dinner, I wanted as many food items made ahead as possible

I was very busy at church that morning, and wanted to enjoy my family, not feel stressed over the meal. One thing I made was this angel food cake layered with rainbow sherbet.

First, I made an angel food cake in a tube pan. Because I am gluten-free, I used a recipe for Gluten-Free Angel Food Cake from Taste of Home’s website. You can use any cake recipe, a boxed mix or even buy one if this is not an issue for you.

Here is a link for the cake I made:

https://www.tasteofhome.com/recipes/gluten-free-angel-food-cake/

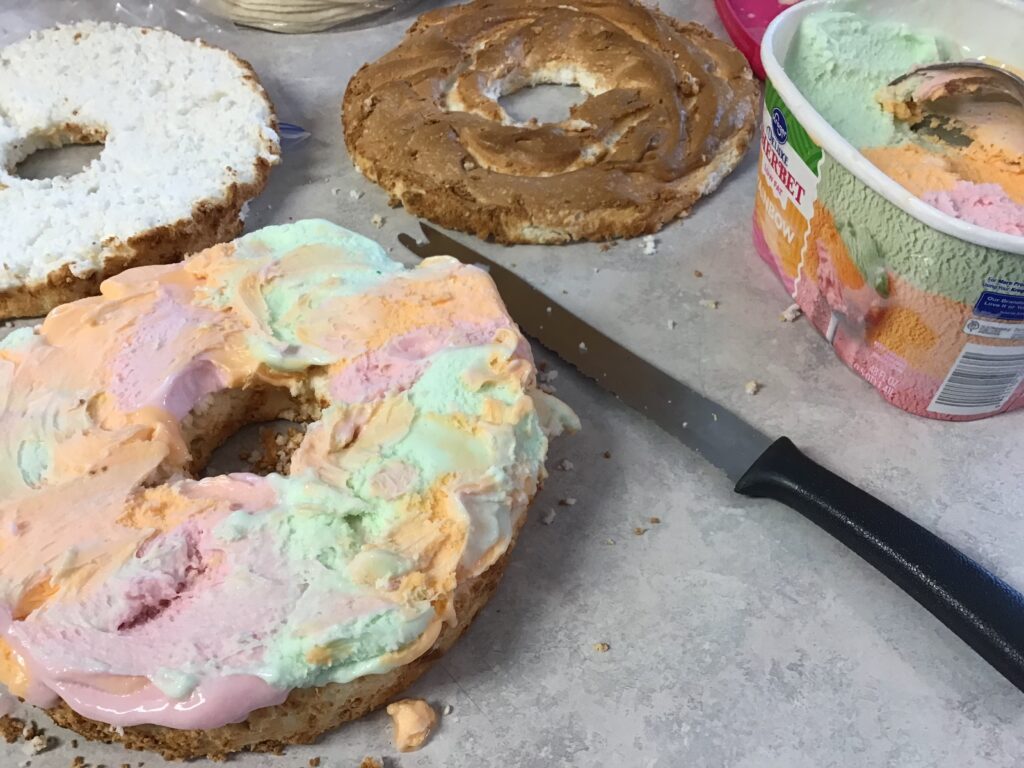
I cut it into 3 pieces and filled each layer with slightly softened rainbow sherbet. I used a large spoon to scoop off slabs and laid them on the cake because I was trying not to mix the colors up too much. After I got the main slabs laid on, I filled in the gaps with small spoonfuls, added the next layer and repeated. It used almost all of the carton of sherbet.

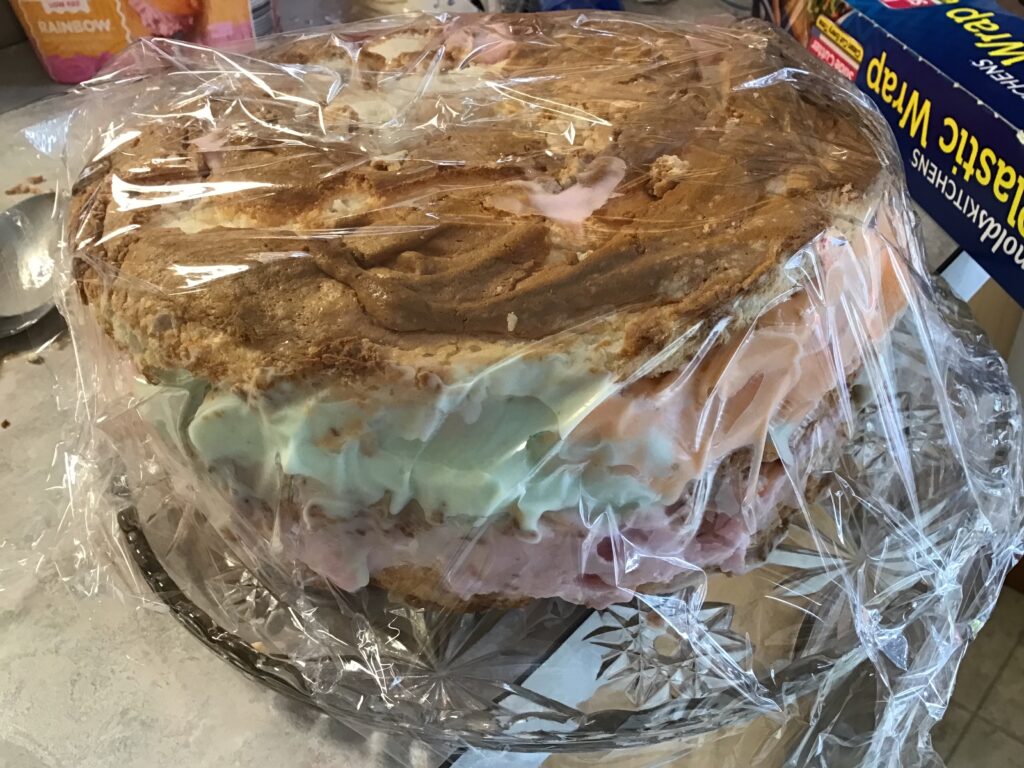
I covered the cake and put it into the freezer to harden up.

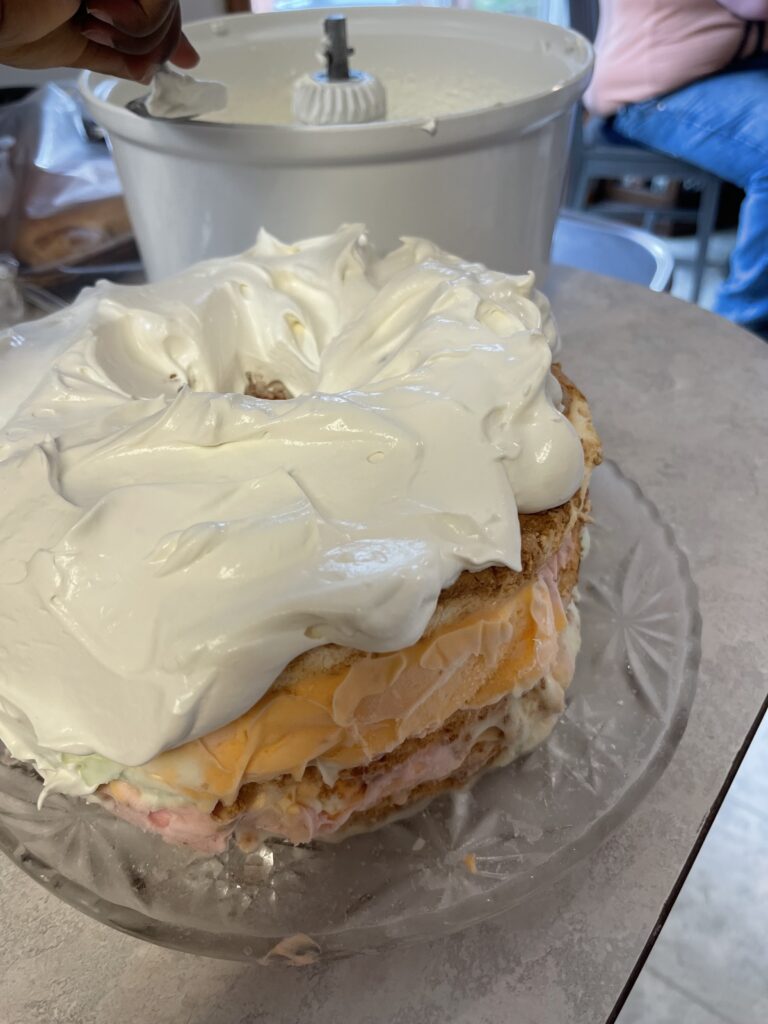
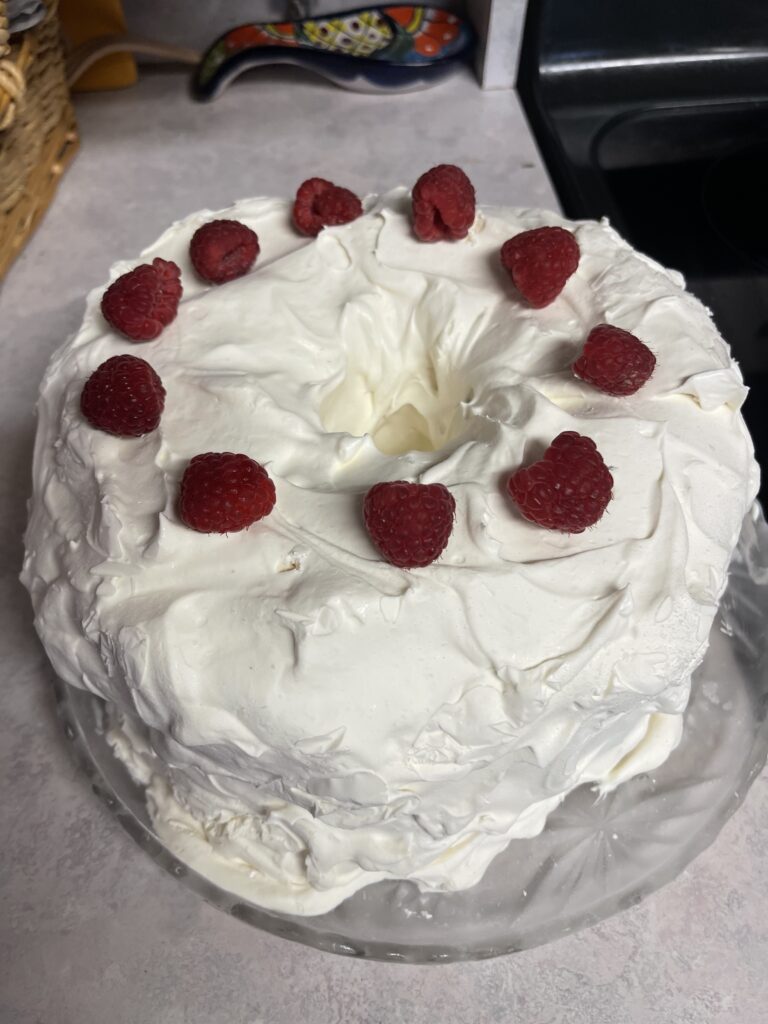
The next day, I whipped heavy whipping cream with a little powdered sugar to stabilize it. I frosted the frozen cake with this whipped cream and put it back into the freezer until Easter dinner was over.

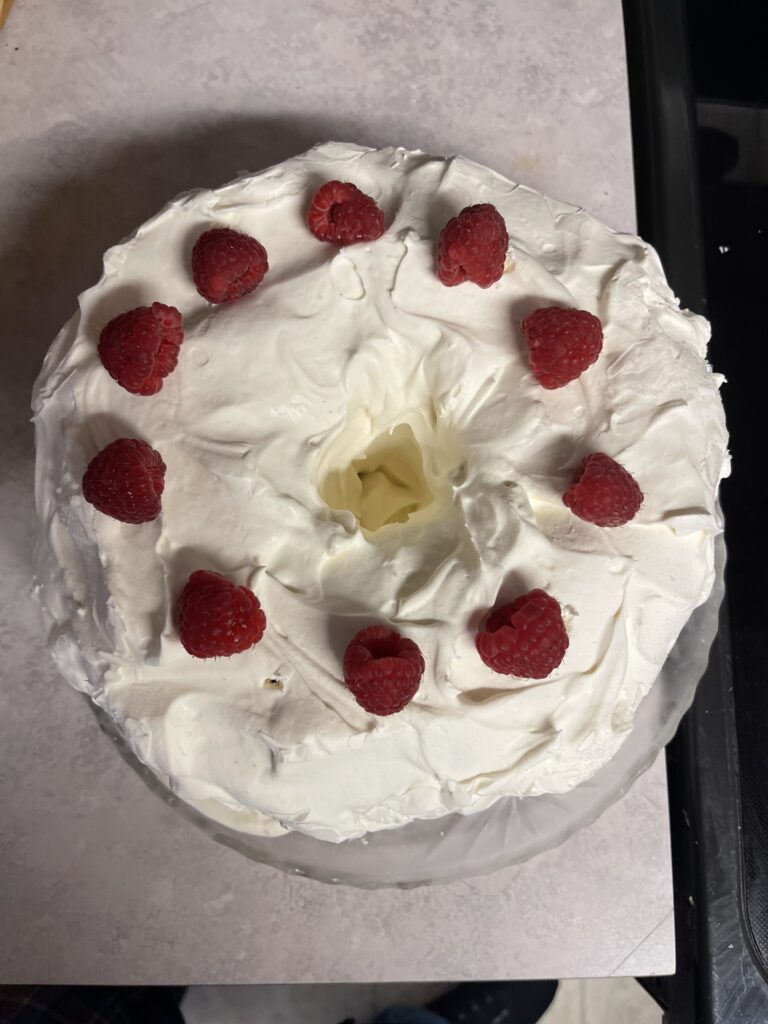
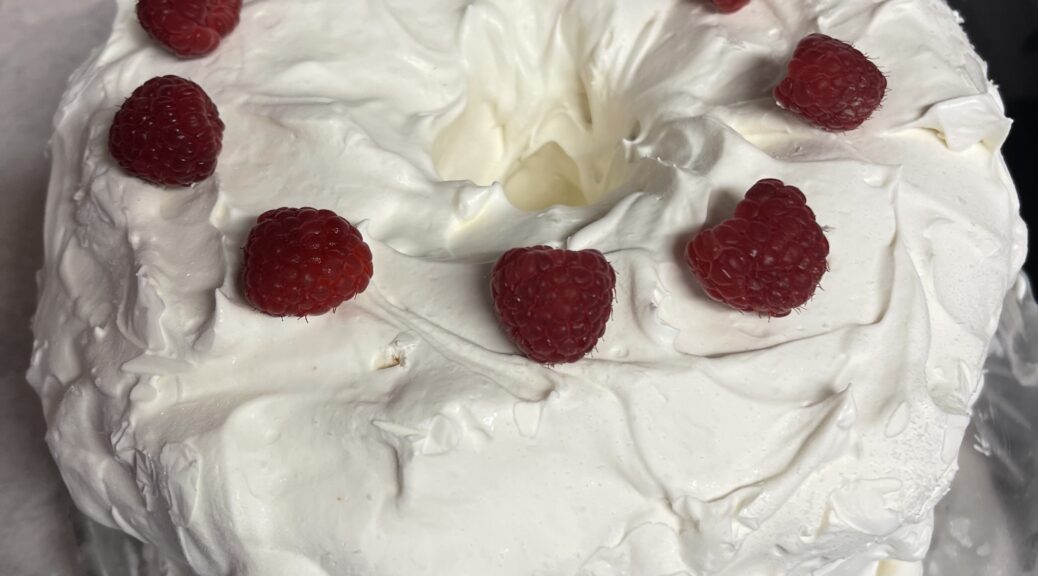
When it was dessert time, I pulled it back out and decorated with fresh raspberries. Rob cut some slices with a large serrated knife, we served it to those who wanted it, and put it back into the freezer to store the leftovers.

It had been several years since I made this cake and I’m so glad I did. It tasted great and people enjoyed it. It was so handy to be able to make it ahead over a couple of days’ time, then pull it out to serve at the end of dinner. In fact, I’m still enjoying the leftovers, because I sliced what was left and froze the slices to pull out one at a time whenever the mood strikes. Which it already did:). Of course, you could fill it with any kind of ice cream or change up the raspberries on top to another decoration or leave plain. For those of you that do need to eat gluten-free, this recipe really works and is forgiving, even if you don’t sift the flour together, but instead just give it a good stir. Just saying!

Beefy Basil Pesto Soup

I’ve been asked to post the recipe for this beefy-basil pesto soup that we love so much. It really isn’t a strict recipe, and you can easily change it up to suit your taste, but here is what I do:

I start with some beef. Sometimes it’s beef chunks, such as stew meat or cut up roast. I often use hamburger. I use around a pound, usually, but that can vary if I have less thawed or am using the leftovers from a roast.

I brown that if it is not cooked already (leftovers) with a large onion.

Then, I add whatever veggies I have on hand, sometimes including, but not limited to the following:

Large chunks of peeled carrots or a pint of canned carrots, large chunks of potatoes (fresh or canned), celery (fresh or frozen), green beans (fresh, canned or frozen), zucchini (fresh or dried), and peas (fresh or frozen), added right at the very end so they don’t get overcooked. For our family, I usually add 3-5 of things like carrots, stalks of celery, and potatoes, 1 large or 2 small onions, around a pint of green beans, and a small amount of zucchini or peas, if using.

For the liquid:

I add a quart of beef broth, a quart of canned tomatoes and a quart or more of water, depending on how much soup I want. If I don’t have beef broth, I can just use water or add boullion to some water. I don’t like it super acidic from too many tomatoes, so I find 1 jar is enough for our taste, but you could do as many as you like in your soup.

Seasoning:

I usually put in a healthy amount of Italian seasoning (probably at least a tablespoon), but sometimes add garlic powder, basil, parsley or other dried herbs I find in the cupboard. I find the Italian-type herbs go well with the pesto. I add salt and pepper to taste–AFTER I add the pesto, as mine is salted and peppered when I make it. I usually add 3-4 ice cube tray-sized pesto cubes. I put in 2, taste it and add more if needed.

I bring the liquid, seasonings, browned or cooked meat and veggies to a boil, then simmer for up to 2 hours, depending on how tough the meat is or when I need to serve it. It really only takes about 1/2 hour to softened the veggies, so I have served it sooner when desperate, but the flavors do not meld together very well in such a short time.

Pesto is what makes this soup so amazing. I make my pesto in the summer with basil we grow. It doesn’t have any nuts in it. It has basil leaves from the garden, olive oil, parmesan, garlic, salt, pepper and lemon juice in it. I whirl it around in the food processor until mixed and freeze it in ice cube trays. I then pop the cubes out into freezer bags and use them all year.

I made a lot last year. I can already tell it wasn’t enough, so I’ll make even more this summer. It takes a lot of basil leaves for a batch. I find that if I go out and harvest once there are a good amount of leaves on the bushes, they will grow back so I can do several batches over time from one set of basil plants. I’m just careful when I harvest to cut above the place where new little leaves are trying to bud out–it’s like giving the plant a good pruning and it just grows more basil over time.

I’m sure any purchased pesto would work just fine. You would have to add some, taste, then add some more to make sure the flavor is to your liking. This would be a great way to use up that partial jar of pesto you have lurking in your fridge!

Please feel free to ask any questions you have in the comments below, but be creative and feel free to customize it to your family’s taste.

Quick Gluten-Free, Dairy-Free Pumpkin Muffins

IMG_9722

I opened a large can of pumpkin last week and experimented with an old recipe out of a cookbook from the 80’s.  I converted it to gluten-free, and also cut the sugar down.  To use up the rest of the pumpkin, today I made a double batch, and made them dairy-free as well.  I will use some of these now, and freeze the rest for the upcoming holiday season, where they will be handy to grab and take with me to various gatherings, or make a quick meal when I’m in a hurry.  They are quick because they use pancake mix as their base, along with pumpkin pie spice rather than 3-4 spices, so there are less ingredients to buy, find and measure.  That is especially helpful when you are doing gluten-free baking, especially if you are new to it, or just taking something gluten-free to a gathering.  Then you don’t have to clog your cupboard up with several kinds of flour to make muffins.  (When you cook gluten-free, you always use a blend of flours.  It works better.  The pancake mix has already blended them for you.)

(I doubled this)

2 cups gluten-free pancake mix. (I used Pamela’s)

2/3 cup packed brown sugar

1 teaspoon pumpkin pie spice

1/4 teaspoon salt

2 large eggs

1/3 cup vegetable oil

1 cup pumpkin puree (or mashed winter squash)

1/4 cup non-dairy milk (last week, I used regular milk, it works fine, this time I used coconut milk, as that was what I had open in the fridge)

1/2 cup mini chocolate chips (I used Enjoy Life)

Put ingredients in bowl. Mix until just blended.  Spoon into greased mini muffin tins, or regular muffin tins lined with papers.  Bake the mini muffins for about 10-12 minutes at 350 degrees, and the regular sized ones for about 20-22 minutes, or until done.  Place on rack.  After cooling for 5 minute, remove muffins from pans and let them finish cooling on rack.  They are very moist and it works best to just freeze any you are not going to consume within 1-2 days.  It’s very easy to remove a couple mini muffins from the freezer and let them thaw on the counter or in the microwave for a quick breakfast or to go with soup.

A double batch made 36 mini muffins, and 12 regular muffins.  I decorated the larger ones with additional mini chocolate chips, and will freeze those to take to a holiday meal, gathering, or for a time when I’m having company over.


Easy Gluten-Free Breakfast Pie

IMG_6058

This egg pie has been a favorite of our family for years.  I thought I’d make one this morning and share the recipe.  It is a perfect recipe to make for either breakfast or dinner and can be made ahead during the busy holiday season.

The first thing I did was make the crust.  I grated 4 medium, peeled potatoes into a pie pan that had been sprayed with non-stick spray.  Then I sprinkled it with oil and salt and pepper and cooked it in a 400 degree oven for 15 minutes.  (20 would have worked, too, and it would have been a bit crispier on the bottom)

IMG_6055

While that was baking, I mixed 3 eggs, 1 teaspoon dried, minced onion, 1/4 cup 1/2 and 1/2 (milk works) and a little bit more salt and pepper (probably 1/4 teaspoon each).  This is the filling.  If you want more eggs, you can add in 2-3 more eggs without changing the basic recipe much, and there is room in the pie dish for them.  I also got my toppings ready.

Toppings:  Today, I used turkey ham bits (about 3 Tablespoons) and cheese(1/4-1/2 cup).  In the past, I’ve used so many different things.  Here is a list of things I’ve used at times:  cooked spinach, cooked Swiss chard, cooked broccoli bits, ham pieces, bacon bits, leftover taco meat, parmesan cheese, mozzarella cheese, any other cheese I had laying around—basically any leftover that I thought would taste good on there.  The key is to not put much of anything odd or strong-flavored on it, or the kids won’t eat it:). Small bits–no problem!

When I removed the crust from the oven, I poured the filling into the crust, and than added the toppings and popped it right back into the oven.

I baked that for 15 additional minutes in the 400 degree oven.  Then, we were ready for breakfast.  If you have added more filling, or lots of cold leftovers, you may need to cook a bit longer, say 20 minutes.  You want the filling to set.  This pie serves around 6 and can be made ahead and reheated one slice at a time, as needed.

IMG_6059

We enjoyed it with home-canned pears.  It is tasty and economical, especially with egg prices as low as they are right now!

Gluten-Free Cashew Chicken

IMG_4904

I found the recipe for cashew chicken that I promised to post.  I made it for dinner tonight and remembered why I loved it so much.  So, here’s to Jeannie–cashew chicken over rice

I started with a recipe from Taste of Home, and have changed it up over the years.  Here’s what I did today.  This recipe is very flexible.

Mix:  2 cups chicken or turkey broth

1/4 cup cornstarch

3 Tablespoons gluten-free soy sauce (we buy it by the gallon at Cash and Carry)

1/2 teaspoon ground ginger

Stir those ingredients together, and set aside.  This is the sauce that gives the stir-fry a great flavor.  Stir it one more time right before pouring it over the veggie/meat mixture.

Cut up vegetables and chicken and put into bowls, piles on a cutting board, whatever you want.  It just works better to have it all cut up before you start.  You can vary the veggies according to what you can grow, or get on sale.  Today I used:

2 boneless, skinless chicken thighs cut into very small pieces (Mine were diced into about 1/4-1/3 inch pieces)

1/2 medium onion, diced

1 carrot, diced

Celery sliced thinnly (today it was the center of a stalk that needed used, other times I might  use 2-3 sticks)

4 large mushrooms

1 cup snow peas ( I would have liked 2 cups in there, but that’s what I had today)

1 bunch broccoli, cut into flowerets (it was 1 medium-sized bunch)  I also cut the stem into small pieces and added that in.

2 cloves garlic, minced

IMG_4903


I put a small bit of oil into a frying pan and cooked the chicken and onion for about 4-5 minutes, until the chicken was looking almost done.  Then, I added a little more liquid (some of the mix I made above, or plain broth.  If you use the mix, take from the top so you don’t get any cornstarch at this point.)  Then, I added the veggies in the order of hardest first, and softest (or anything that needed to stay crisper)last.  So, today I had carrots, celery, broccoli, mushrooms, snow peas and minced garlic.  If you have a different assortment, it will work.  Others I like in there are zucchini and summer squash, peas, and bean sprouts, to name a few.  The sauce is very important and it gives any veggies that great flavor.   I let it cook for a bit, stirring often.   After the veggies were crisp, but getting tender, I poured in the mixture.  I continued cooking and frequently stirring until the mixture thickened.  I did not let the veggies get very soft, just crisp-tender, because that is how my family likes them.

I made white rice to go with this, and it sopped up the marvelous sauce nicely.  I sprinkled some cashews on top of each portion after it was plated.  This would have been enough for 4 normal people, but 3 of us very hungry people ate it all.  It would be easy to stretch this, by adding more veggies.  It is tasty and healthy.


April 2017 Low-Carb Challenge–Cauliflower Pizza

IMG_4217

Last month, I did a challenge where I used a lot of pantry ingredients and kept the budget low.  I was very pleased with the March 2017 results.  I used up a lot of items that really needed to be used.  I saved 1/2 of the $200 I had set aside, and saved more than that, since I usually spend more than that in a month on groceries.

I went shopping at Costco, Fred Meyers, Grocery Outlet, Natural Grocers, and a couple of other stores.  I bought sale items, such as 99c/ 1/2 gallon milk, bulk items such as 5 dozen eggs and a 4-pack of butter, non food items like kitchen garbage bags, big black garbage bags, vitamins, Tumeric, lots of produce, and more.  I worked hard to get the best deals possible from many sources.  Now, I’m stocked back up on both food items and other supplies.

This month, I decided to work on my health.  As readers of this blog know, I’ve had diabetes for a long time.  I was counting up the years, and realized that it’s been 15 years now since I was diagnosed.  So,  in honor of that anniversary, I decided to focus on finding a few more low-carb recipes this month to encourage myself to keep eating in a way that is interesting and healthy for me.  All those potatoes were great for the budget, but I need to eat only a few of them.  I’m well-stocked for groceries for the month after my shopping trips, and will just buy produce, things I run out of, etc. for the rest of April.  I will also keep eating from my freezers, shelves, etc.

I read several recipes for cauliflower crust pizza.  I combined them and came up with something that I liked.  Here’s what I did:

IMG_4212

I thawed 1 quart-sized ziplock bag of home-frozen cauliflower and pulsed it in the food processor until it was in small pieces.  It would probably be about 4 cups of frozen cauliflower if you purchased it.

IMG_4213

Following the instructions from a couple of sources, I put the pulsed pieces onto a clean, thin towel and squeezed the water out of it.  It was pretty dry.

IMG_4214

I mixed:  Squeezed cauliflower pulp

2 eggs

salt and pepper (a little of each)

3/4 cup parmesan cheese

1/2 teaspoon Italian seasoning

I put foil on a small cookie sheet, sprayed it with non-stick spray and spread the mixture on it.  I baked in a 400 degree oven for 20 minutes.  Then, I turned it over and cooked for another 10 minutes.  I had trouble getting it off the foil so I could flip it, but finally did.  Every source recommended parchment paper, but I did not have any.  So, I might get some and try that another time.

IMG_4215

One source said put cheese on first to keep it from getting soggy, so I did, then spooned sauce sparingly on top.   I want more sauce next time.  Hopefully, it won’t make it soggy. Then, I put pepperoni, olives, mushrooms and a little more cheese on top, and baked for another 10 minutes.

I really liked it. I could pick it up with my hands and eat it.  It was really tasty and good.  It was very low carb.  In fact, there were not enough carbs in it to hold me over to dinner.  That’s a good thing.  I love snacks.  In fact, I went so low (blood sugars), I got to eat chocolate chips.  Double good.  I’m pleased.  Next time, I’ll just eat a few more carbs with it and it will be a good choice for me.  The kids love those $5 pizzas from Little Caesar’s and this will be a good choice for me on the days they want one of those and can talk their daddy into getting them one:)

I’m going to try it again.  I will use less salt than I did this time (I used about 1/2-1 teaspoon).  It was pretty salty.  I may also try it with 1/2 cup mozzarella cheese instead of the parmesan, or only use 1/2 cup of parmesan.  The crust tasted strongly of parmesan, which I enjoyed.  If I wanted a milder flavor, though, I might enjoy mozzarella and Canadian bacon and pineapple.  I have quite a few baggies of frozen cauliflower left from when I froze so much last year.  I am looking forward to using some of it this way.


Gluten-Free Lemon Poppyseed Muffins

img_4067

A reader asked me to post a good muffin recipe. Of the muffins we have made lately, we liked this one the best.  I started with a recipe I used to use frequently before I needed to go gluten-free.  Ja’Ana made it as it was, substituting gluten-free flour for the all-purpose flour.  It was quite dry.  Today, we tweaked that recipe quite a bit, and are much happier with the results.  Here’s what we did:

Dry ingredients (mix together in a large bowl):

1-3/4 cup Bob’s Red Mill 1-1 gluten-free flour blend

1/2 cup sugar

2 Tablespoons poppy seeds

grated lemon peel from 1 lemon

1 Tablespoon baking powder

1/2 teaspoon baking soda

1/2 teaspoon salt

Wet ingredients (mix together in a small bowl):

1/2 cup milk

1/3 cup oil

1 container (6 oz) lemon yogurt (about 2/3 cup)

2 eggs

Stir the dry ingredients together until mixed.  Make a small well in the center of the dry ingredients.  Beat the wet ingredients together and then pour them into the well in the center of the dry ingredients.  Mix together.  Put into 12 muffin cups that have been lined with cupcake wrappers or sprayed with non-stick spray.  Bake in 350 degree oven for 16-20 minutes, until golden brown.  Remove muffins from pans and place on a cooling wrack.  Make lemon glaze and drizzle on top of warm muffins if desired.  We have eaten them many times without glaze. Let them continue to cool until completely cooled.  Freeze any muffins you are not going to use immediately, then remove from freezer, thaw on counter or in microwave,  and enjoy.  Makes 12 muffins.

Lemon Glaze:

1/2 cup powdered sugar

2-3 teaspoons lemon juice (I just squeezed juice out of the lemon I used for the lemon peeling until a nice consistency was reached)

Stir powdered sugar and lemon juice together until the glaze is able to be drizzled on to the muffins.  Start with a small amount of juice and add more until desired consistency is reached.  If you put in too much juice and it is so runny and just slides off the muffins, add a little more powdered sugar until it thickens up slightly.  If you have to spread it like frosting, it is too thick and you need to add more juice.

img_4066


Homemade Corn Tortillas

img_3922

A lot of people are doing a no-spend January.  I think it’s a great idea, but am not participating at this time.  I had several low-spend months this year, and am re-stocking  on some things this month.  I plan to have a lower income during the summer, so that’s when I’m planning my low-spend time.

However, today, we ran out of tortillas.  One daughter assured me there were some in the fridge when I tried to buy them, and another assured me they were gone.  They are a)buried deeply in the fridge, or b)indeed gone.  I wanted to make enchilada bake for dinner.  So, I dug out a bag on masa flour from the stockpile and gave it a try.  I love finding ways to use up things I bought for one reason or another, but don’t use regularly.

I looked up several recipes on the internet.  They were pretty much all the same, with extremely minor variations.  I mixed 2 cups masa (corn) flour with 1-1/2 cup very hot water and a 1/4 teaspoon salt.  I kneaded it until it was a ball, then pinched off balls to shape into tortillas.

img_3919

Then, I cut a gallon-sized ziplock bag up the sides and made my own “press.”

img_3918

I squished the balls with a big pot and some elbow grease.

img_3920

Then I fried them in a pan for about 2 minutes on each side.  I used a little oil in the pan.

img_3921

Then, I just layered the tortillas with home-canned chile verde, refried beans, and some leftover beef pieces I chopped finely.  After 3 layers, I covered the casserole with cheese and some olive slices.  Now, dinner’s in the freezer for Rob to warm up while I am at work! He has a headache today, and I did not want him to have to cook when he gets home.

These tortillas are thicker than the ones from the store, and have a slightly different flavor.  Still, I ate one for lunch, and they are certainly edible.  I’m pretty happy with how my experiment turned out.

Saving Money–Dec. 5, 2016

img_3681

The weather turned colder, and so Rob picked the iris.  It opened right up overnight.  It’s so pretty and unusual to have an iris blooming in December!

img_3668

I also picked a tremendous amount of lettuce from the garden.  I think it’s the last hurrah, but who knows?  I was able to serve taco salad to our family and the friends who visited and still have lots left.

img_3679

We put the tree up in the garage/family room.  It is sitting on top of a table I keep out there.  Rob got a bargain tree for $20 that he cut down on Saturday and chopped it off to fit the small area we have.  We used the branches from the part he chopped off to decorate the railing in front of our house.  He put up a small string of lights as well, outside.

img_3672

I dug through the bins of fabric in the shop and found a Christmas piece.  I used it for a tablecloth to make the kitchen more festive.  I bought a kit for a gingerbread house, plus a little more candy from the bulk section of Winco, and Patsy enjoyed decorating it for quite a while on Saturday.

While shopping, I found chicken drumsticks for 68c/lb.  I bought 3 packages, cooked 1 and froze 2.  We have had spaghetti several times this week, from the batch of sauce I made last Tuesday.  We will finish it today.  It was a large batch and was made from home-canned tomato products, 1 pound of ground beef and various odds and ends of parmesan cheese that were in the fridge, over gluten-free noodles I had on hand.  We also had make-your-own tacos/taco salad with our friends.  There are still quite a few leftovers in the fridge to keep the family eating for the first part of the week.


Quick-Cooking Tapioca

img_3666

I’m always looking for appetizing ways to use the food that I have stockpiled.  There’s no point in having lots of food, just so it can get old on the shelves, and  end up cooking with stale, outdated ingredients.  Sometimes, when food is bought in bulk packages, it is much cheaper, but the purchaser ends up with more than they can use.  Last spring, this happened to my mother.  She bought a large package of quick-cooking tapioca and gave me a baggie of the excess.  I did not end up using it all up over the summer, so when I found it again recently, I decided to target it in my meals.

The first thing I did with it was use a couple of Tablespoons to thicken a beef stew.  This was a stew that was made from beef, broth, canned tomatoes, onions, carrots, potatoes, beans and some herbs and spices, plus salt and pepper.  When I finished, it was pretty runny.  I just put in a little tapioca and it thickened up nicely.  I am gluten-intolerant, so this made a nice substitute for wheat flour.

The second thing I made was tapioca pudding.  I got a recipe from the Kraft website.

2-3/4 cups milk (I used 2%)

1/3 cup sugar

3 Tbsp. Minute Tapioca (I have no idea of the brand my mother gave me, but it worked)

1 egg beaten

1 teaspoon vanilla

I added:  1/4 teaspoon salt and a teaspoon butter

Mix milk, sugar, tapioca, salt and the beaten egg in a saucepan.  Let sit for 5 minutes.

Cook on medium (I did med-high and watched it very carefully), stirring the entire time, until mixture comes to a full boil.  Remove from heat.  Add vanilla and butter.  Cool 20 minutes; stir.  Serve warm or cold.  Makes 6 servings.  Store leftovers in fridge.

When I got done cooking the mixture, it was so runny I though I had made a mistake and had tapioca soup.  The recipe says it thickens as it cools, but I thought there was no way this would become pudding.  But, it really did.  In fact, it turned out to be very thick once it was cold.  So, I might actually use 3 cups milk next time.