Category Archives: Gluten free

Homemade Gluten-Free Tater Tots

I have been having a hard time finding tater tots at the store. When I do find them, they are very expensive and the last bag I purchased simply crumbled into little bits whenever we cooked them. However, I did find some bags of potatoes on a really good deal–20c/lb–and bought about 30 pounds. I have a couple of projects I wanted to do. One was making tater tots. I had done it one time before and we liked them, so it was time to try again.

I combined several recipes I found on the internet. I wanted plain ones, not including cheese or onions or many spices.

I parboiled peeled, whole potatoes–10-15 pounds–not sure because I used several partial bags, plus one full 5-lb one. Mine stayed in the hot water a little too long–about 8-10 plus minutes because I got distracted. I believe 4-6 minutes for small potatoes and 6-7 minutes for really big ones would be about right.

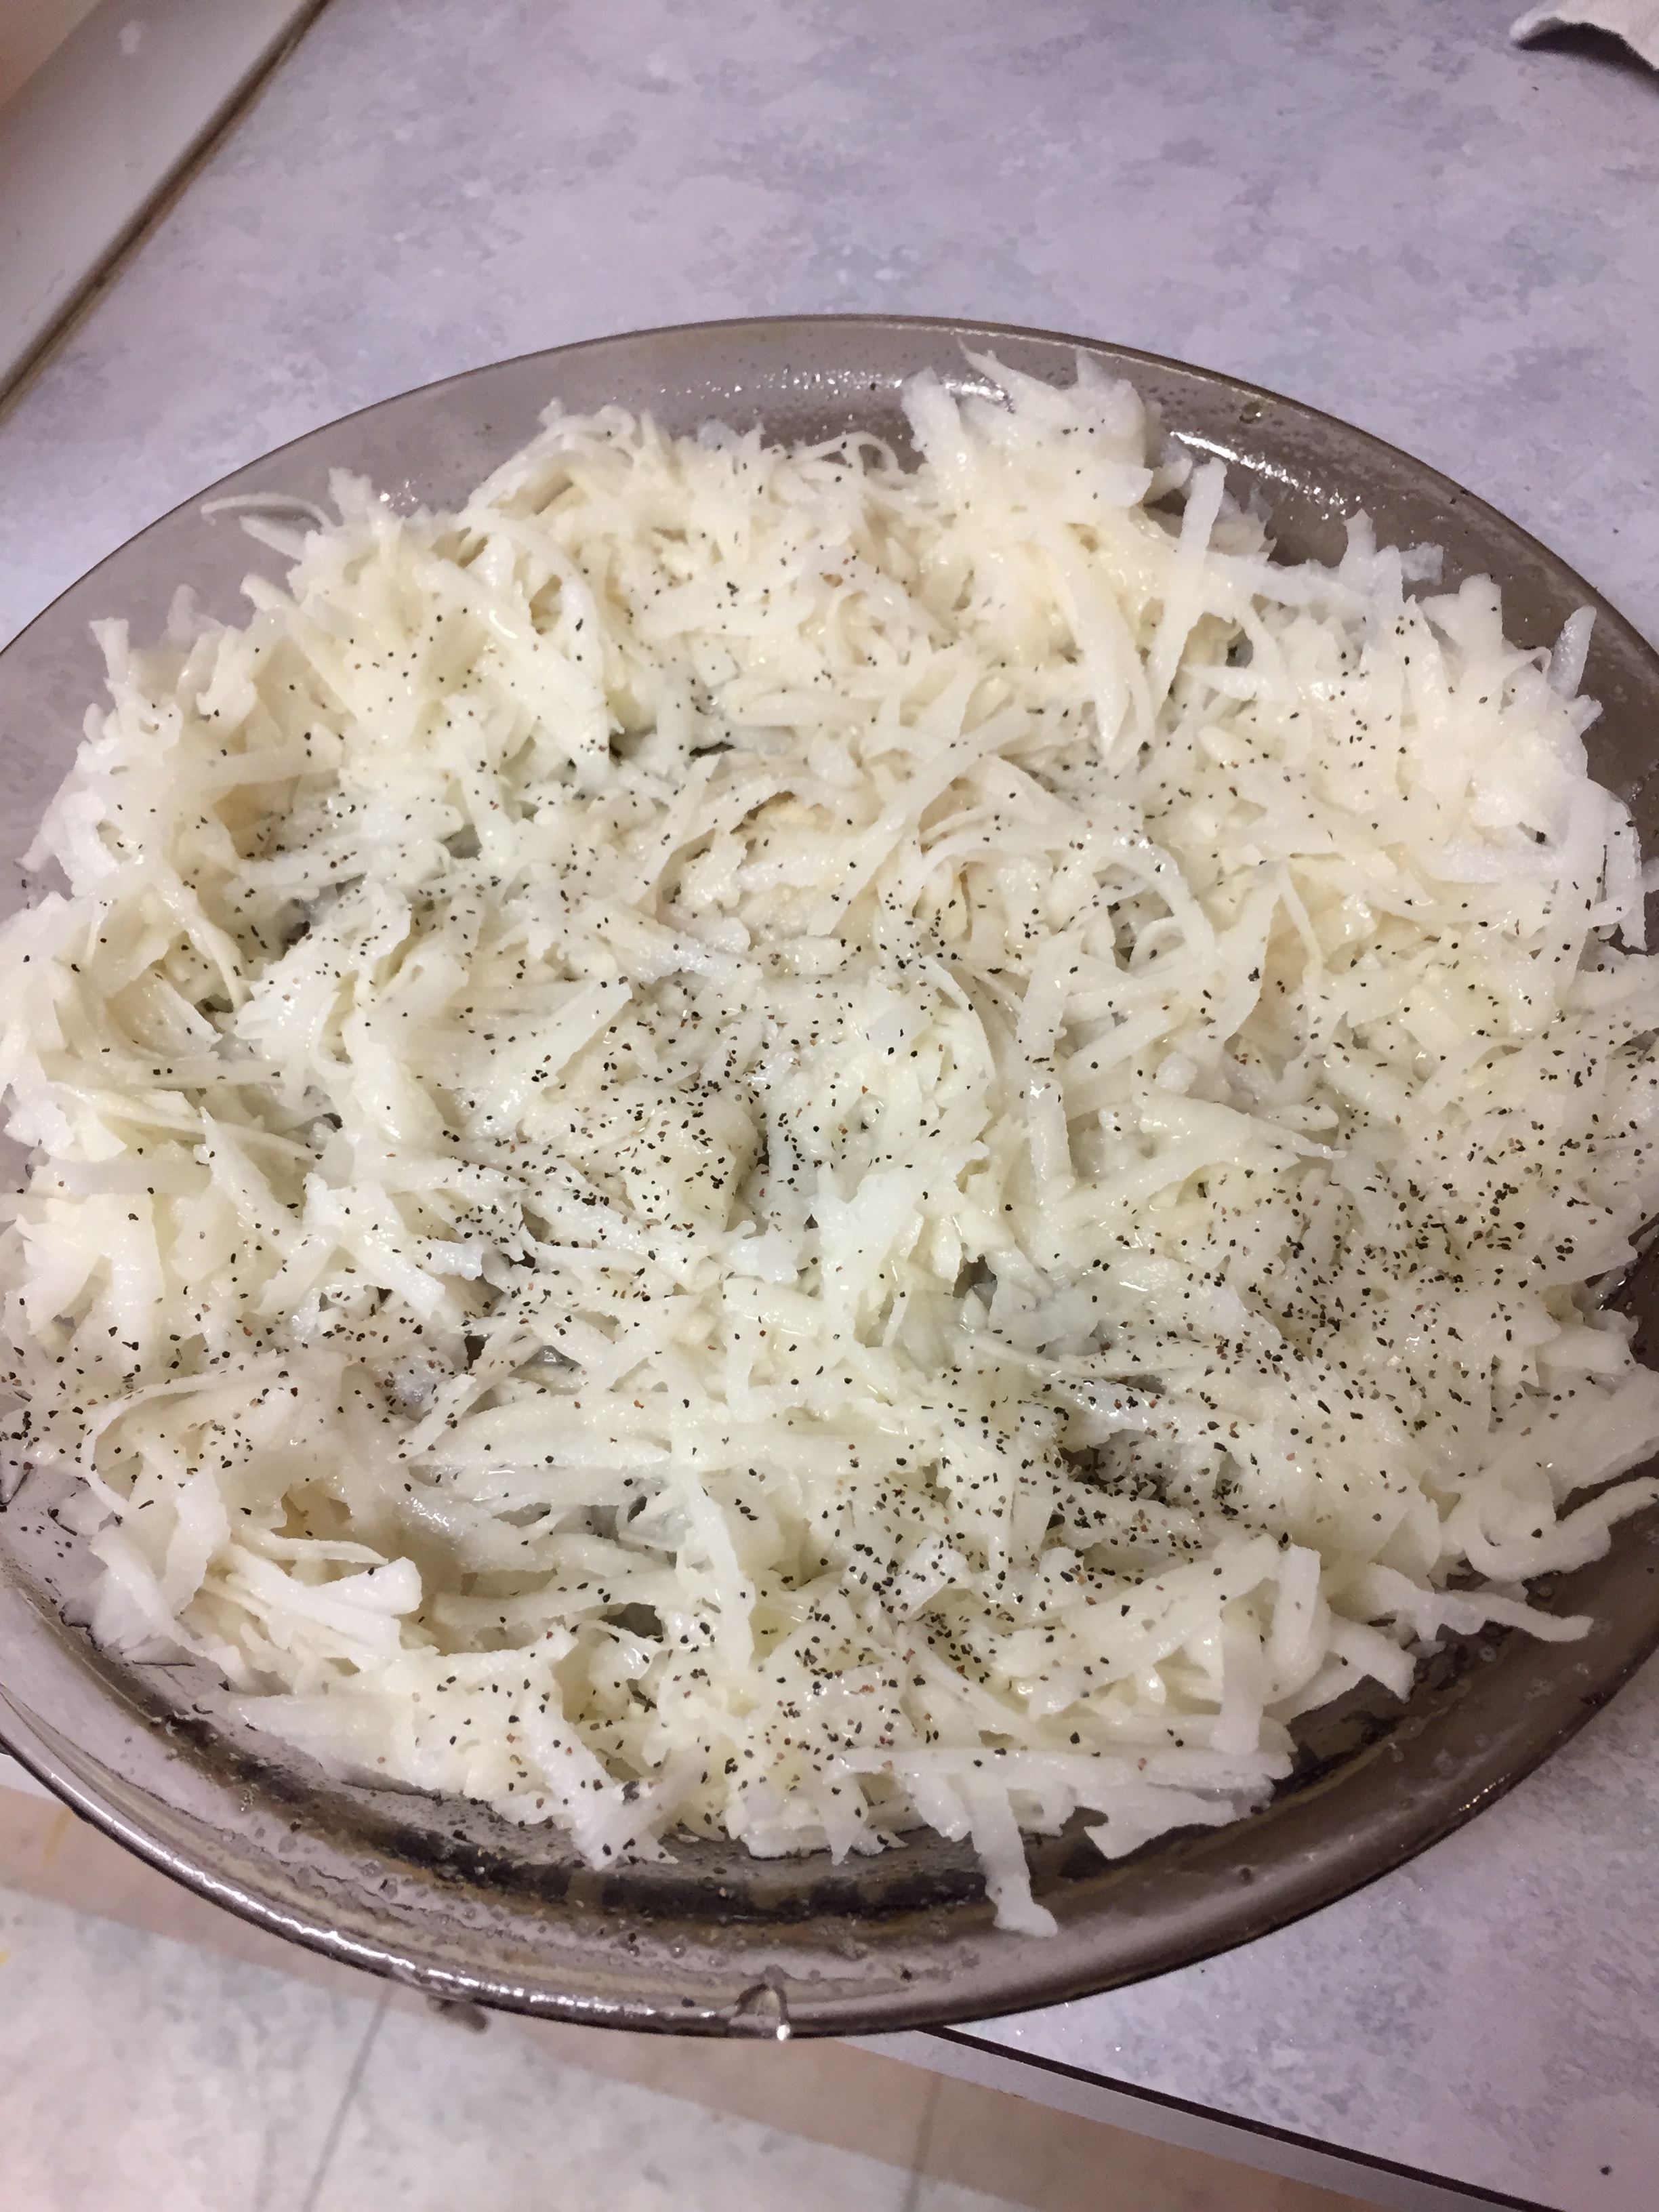
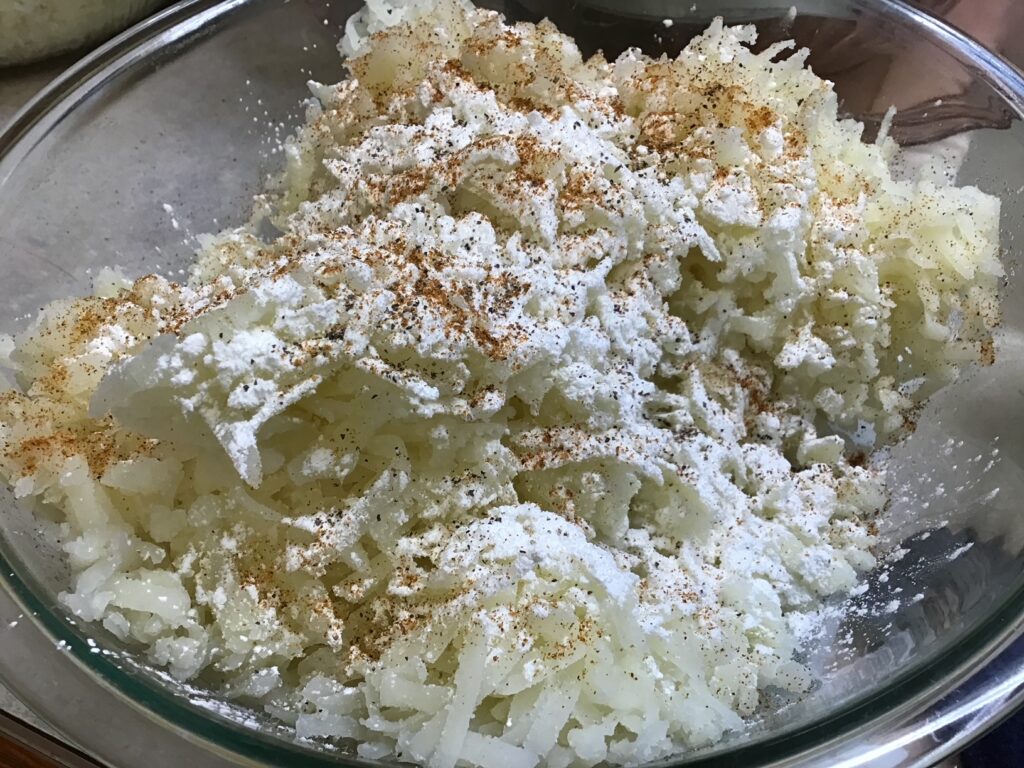
After cooling them enough to handle, I grated them and put them into a bowl. Sadly, some were so cooked it was more like pushing mashed potatoes through the grater–oops! I filled 2 of the largest Pyrex bowls I have with shreds. The following recipe is for one large bowl, which was about 5-7 pounds of shreds. Mix:

One large Pyrex bowl of parboiled potato shreds

1 Tablespoon Cornstarch

1 Tablespoon 1-1 Bob’s Red Mill Gluten Free Flour

1 teaspoon salt

1/2 teaspoon pepper

1/8-1/4 teaspoon cayenne powder (to taste–mine are not hot at all

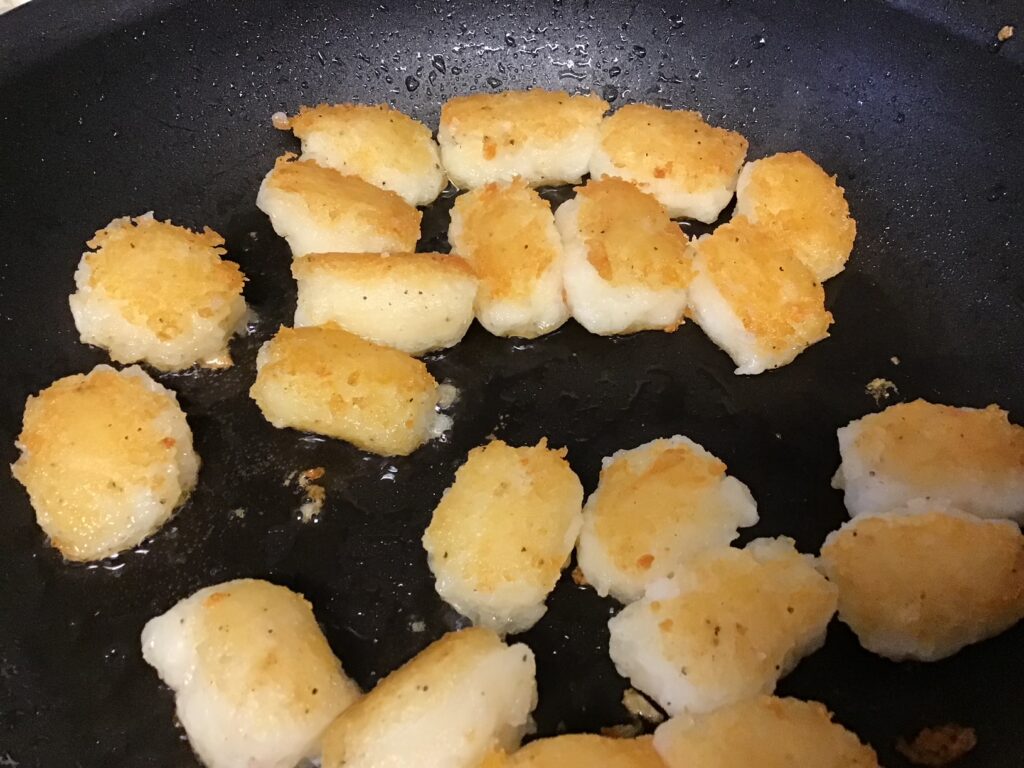
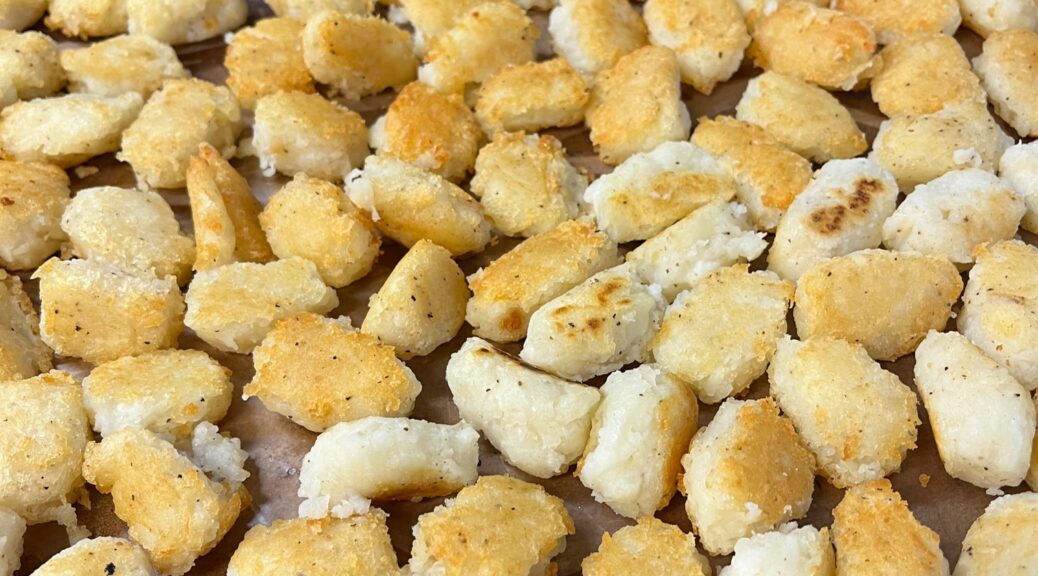
I formed them into little logs with my hands and fried them in a little bit of canola oil until they were brown. Because I parboiled my potatoes too long, I confess some of mine are more like fried mashed potatoes. They still taste good, if I have to go with how many disappeared while I was frying them off. There were 5 of us here nipping on them, and yum! is all I have to say.

The only other time I made them, I didn’t cook my potatoes too long and there were distinct hash-brown like shreds in them, which finished cooking as they were pre-fried and also baked afterwards for serving. I will do that again next time.

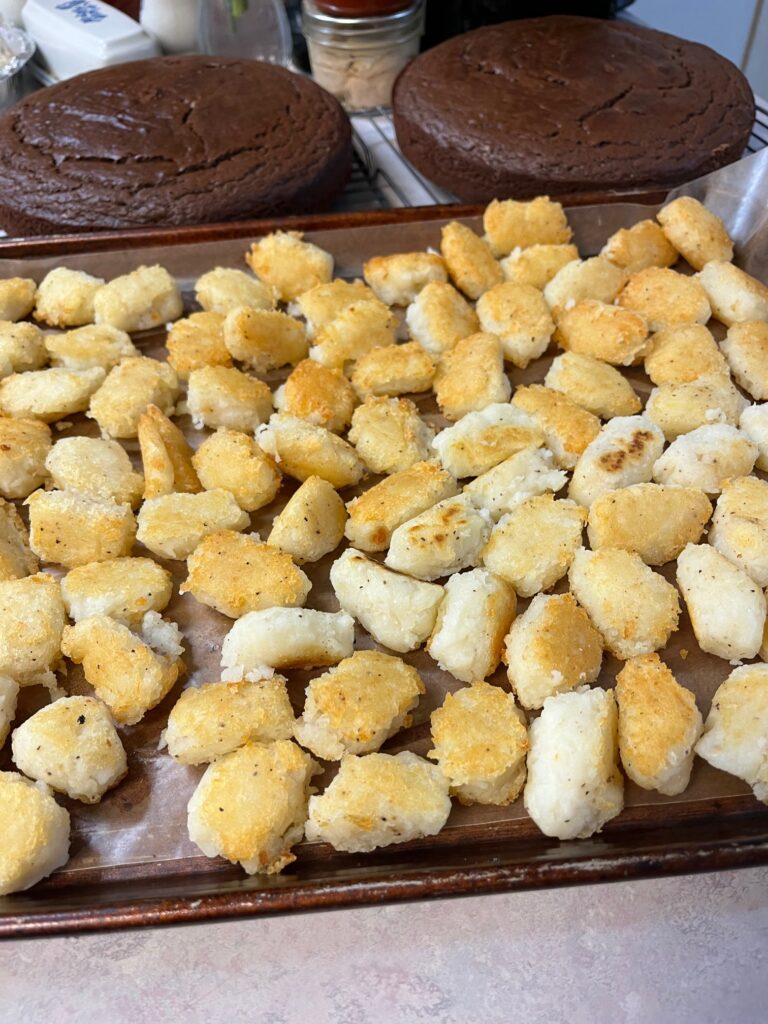
I cooled them on paper towels and put them on a waxed-paper covered cookie sheet. That pan went into the freezer to flash freeze and I will transfer them to baggies once they cool. When I made these before, I simply warmed them up in the air fryer or oven when we wanted to eat them, just like I would do with the frozen ones from the store.

I’m excited to have tater tots in the freezer again. There were so many possibilities I saw on the internet, including adding cheddar cheese, onion powder, green onions or chives and more. There were also lots of different combinations of flours to use as binders, such as potato starch, regular wheat flour (for those it doesn’t bother), and other flours. I concluded that the main things were potatoes, salt, pepper and a little flour of some sort to bind it together. It did take quite a bit of time to form and pre-fry all these. I ended up with that huge pan full, plates and plates that people snacked on or ate for dinner, and a few extras that didn’t fit on the tray.

Thriving In My Thrifty Week–October 13, 2020

We slipped away this week for a few days and went camping.

We went to South Beach State Park, at Newport. The weather ranged from nice, warm and relatively sunny to stormy, windy and rainy. It was extreme and very changeable! One stormy day, we took a short drive south on Hwy. 101 and saw lots of beaches that would be fun to explore on a nicer day than that one.

Rob and Patsy spent several afternoons down on the sand, collecting rocks. Even on days that were rainy and windy, they enjoyed their time down there. I stayed back at the camper and read several books, sewed, and slept. I had downloaded several books from the library app to read, and took a couple of actual books, too. At the last minute before we left, I grabbed some fabric and my sewing machine and during the trip, I worked on putting together a quilt top with fabric I’ve had for a long time. I also used several pieces I received in kits at a shop hop I went to a year ago. I had decided I didn’t want to make those particular blocks, but didn’t want to waste the fabric. I’ve got a ways to go, but I have a plan now, and am making progress.

I took several long walks with them, went for a drive, and we took Patsy to the candy/ice cream store one time.

Camping is super fun and economical for us. We used our park pass to pay for the campsite. We took food for all our meals, and I packed a picnic for the first day. Lots of our home-preserved food was used in those meals. Our trip was fairly short this time, so we wanted to get down there early. We knew our campsite wouldn’t be ready until afternoon, so we just went to the day use area until it was time. It was funny when we checked in to see if we could get into our spot early. The ranger suggested we drive into town for a “bite to eat” while we waited. I politely said we’d be back at 2, like he told us, and got back in the van, inwardly chuckling. Think that one over….why would we want to drive a 15-passenger van towing a 32 foot trailer back to town, find a place to park it, and eat at a restaurant and then find a spot to turn it around to come back? During Covid-19, no less? Someone else might want to do that, but not us–it was much easier to pack some food into a cooler:).

Last evening, I took one more quick walk down the beach look-out path. We woke up again to a windy, stormy, rainy day.

Rob hooked up the camper while standing in about 2 inches of water this morning. I helped him. The rain was blowing sideways in the gusty, strong wind. Because you have to empty your trailer tanks at the entrance of this park, we put dry clothes inside the camper door, and just changed real quick after we hooked up, then drove to empty, so we didn’t have to stay soaking, sopping wet!

Before we went, I was able to pick several items from the garden to use in meals, and we took the rest with us. I was surprised at how much garden lettuce I ended up with. We had salad every day, mixed with a head I had on hand. Yum! I packed leftovers into the camper out of the fridge in the house and we ate them up. I cooked rice and marinated some chicken for the first night to make it easy. I did some cupboard cleaning while I was camping, and pulled out a basket of food that needs to be used. I ran out of time and didn’t make it to the store for last minute food items before we left. We made out fine. I won’t go again until next weekend, as there is still plenty, which always saves me money when I skip a week of shopping. I have several meals planned for the next few days, starting with chicken-rice soup, which I made for supper tonight. Jake will come over tomorrow, as usual, and he eats that, so I won’t have to run to the store for “Jake-food” for a few days.

It was great to get the camper out. For various reasons, we’ve had to cancel almost every reservation we’ve made, so this was only our second camping trip during the last year. Hopefully, there will be more before too long!

What Did We Eat? March 1, 2019

This week, I made gluten-free pizza twice. The first time, it was deep dish combination pizza. I killed part of the yeast by using too hot of water, so it did not rise well. Still, it rose enough that we could eat it, and so we did!

I checked the yeast, determined I was the problem and not the yeast, and made another batch, but this time, I made 2 flat crusts. I par-baked them for 5 minutes at 500 degrees F. and froze them. Tonight, I pulled one of them out of the freezer, topped it, and baked for 15 minutes at 500 degrees F.

I also made up a few baggies of the dry ingredients for the pizza and put them on the shelf for another time when I want to make it quickly. Now that I have the recipe working properly, I will post it soon.

Rob barbecued some steak. I sautéed some frozen shrimp. I also made turkey-burger meatloaf, which we ate a few times until it was gone. We ate the chicken we got last Friday at Costco, boiled the carcass and made broth, which turned into chicken and dumplings.

We ate several kinds of canned and frozen fruit, including frozen blueberries, which Patsy ate straight from a bowl while they were still frozen. She also had smoothies a couple of times and used more frozen fruit in those. I’m not exactly sure what else came out of all those empty jars that are waiting to be put away in the shop, but I know we enjoyed eating whatever was in them!

We had home-canned green beans, lots of carrots, and quite a few salads. We had baked potatoes a couple of times and Rob made home-shredded hash browns, too.

It was a very busy week, full of medical appointments, working extra time with the kids, and other things we did. I feel happy that I got as much cooking done as I did and that all of the dishes got done, too! (Rob can’t wash his fair share until after he recovers from one of his medical tests, so I’m merrily washing away. Every day. Every dish. Patsy dries and puts away. By the way, Rob is very, very fine–it was a great result, praise the Lord–and he’s trying not to laugh too loud about having to take a break from dishes and hauling firewood!).

Jake and Michaela ate dinner here tonight, and they had cinnamon sugar toast on whole wheat bread. (Under duress, she ate 1 baby carrot and Jake ate 2 cucumber slices) Jake wants to spend the night, but I took Michaela home because she wants to be there. While I was gone, Rob cooked eggs and eggs for Jake, and he topped off his evening with mini-marshmallows, washed down with grape juice. How’s that for a before-bed snack? Hmmm. I hope your meals were less eclectic!

Gluten-Free buns

I haven’t made gluten-free buns for a long time. It was time. I have a favorite recipe that I’ve made for years and years.

This recipe uses oat flour as a base and they are so yummy. They also don’t take very long to make, as they only have to rise for about 30 minutes and bake for 15. The thing that does take a lot of time for me is rounding up all the ingredients.

After I had dug through my bin of gluten-free flours and other products, I was able to come up with everything that was called for. Then, I decided to take the opportunity while it was all out to make up some mixes so I could make this again soon in a hurry.

When I was done, I had 4 bags to make up another day. Today, I made a double batch, and will freeze the left-over buns for the future as well.

I was delighted to enjoy these yummy treats again. I saved money by making them myself vs. buying buns for between $5 and $6 a package. Since I made a double batch, I got 12 buns. That would be equivalent of 2 packages at the store. Gluten-free flour is not cheap, but it wasn’t $12 for flour for these buns. Also, I had it all on hand! I used up bits of flour that had been around for a long time.

While I was at it, I emptied my gluten-free bin, washed it out, discarded a couple of things that were rancid or really, really old (come on, Becky….pancake mix from 2014? Really?), and put everything back in an organized fashion. Now, I know what I have and what I need to replace. My January “Use-it-up” project is coming to a close, but I can see there are quite a few items that still need to be used, so I can feel a February project coming on.

Gluten-Free Cooking Day–Spring Break 2018

IMG_6537

Yesterday, I spent several hours cooking with a young friend of my niece.  She is only 17, and has been told by her doctor to stop eating gluten.  They also want her to eat only a small amount of dairy while they figure things out.  So, because they have not eaten this way before, her mom wasn’t sure what to make, and she wasn’t either.  So, she asked for a little help.  I love to cook, and never eat wheat, so jumped all over the opportunity.

The first thing we made was focaccia bread.  The recipe was from a book called “The Gluten-Free Bible” that I’ve had for several years.  They have you put zucchini and tomatoes on top, and sprinkle with Parmesan cheese.  She only put the tiniest bit of cheese on hers.  I put too many toppings on mine and it was a bit moist under the zucchini, but still good.  When I’ve made this in the past, I’ve focused on the cheese only, and have never put any tomatoes on it before.    It came out great, and we each had one when we were done.  We used the Pamela’s flour mix for bread for this one, and I sent enough home for her to make it again if she wants to.

IMG_6538

The second thing we made was lemon poppy-seed muffins, from the same cookbook.  I’ve made them before, and they turned out great, as usual.  We did not put glaze on them.  For these muffins, we used the Bob’s Red Mill 1-1 gluten-free flour blend.  Again, I sent home enough for her to make them again or to make another item.

The third thing we made was cookies from Gluten-Free and More magazine.  They were made using sunflower seed butter, cocoa powder, an egg, and some brown sugar.  Yum!  This was a new recipe that my friend had tried, and it was delicious, so I wanted to make it.

IMG_6539

Last, but not least, we made a masa crust for a taco pizza.  I got this recipe from Eating Well  magazine and tore it out a while back, but hadn’t tried it yet.  Basically, we mixed the 1-1/2 cup masa flour with 2 eggs, 1/2 cup water, 1 tsp.garlic powder, 1 tsp. Chile powder, 1/2 tsp. salt and 1/2 cup green onions and patted it out on parchment paper. Then, we baked that at 400 degrees for 10 minutes.  We fried up some hamburger with taco seasoning, and I took her home with her crust and taco burger and all her other food items from the day to eat as she wished.  Later, at our house, Rob spread refried beans, the meat and cheese on ours and put it back into the oven until it was warm and the cheese was melted.  Then, the recipe calls for taco toppings such as tomato, lettuce, salsa and avocado, but he just ate it plain.  When I got home from my errands, I had some and it was extremely good, even warmed up in the microwave (even cold) and we will make it again.

IMG_6540

It was fun to try some new recipes with Kim.   We talked about snacks that she could buy to take to school and how important it is to clean the counter of crumbs before she cooks and many other things.  There are so many good options available now that there is no need for anyone to feel deprived, but it’s just a matter of figuring out what works for each individual.   I anticipate that we may cook again another day!  When the day was done, I loved that I had dinner for us, and some goodies for a few days.  Now I’m on a roll and want to try some of the other recipes I found while planning for our cooking day.  No worries….Easter is Sunday and I will cook a couple of things for that.

Easy Gluten-Free Breakfast Pie

IMG_6058

This egg pie has been a favorite of our family for years.  I thought I’d make one this morning and share the recipe.  It is a perfect recipe to make for either breakfast or dinner and can be made ahead during the busy holiday season.

The first thing I did was make the crust.  I grated 4 medium, peeled potatoes into a pie pan that had been sprayed with non-stick spray.  Then I sprinkled it with oil and salt and pepper and cooked it in a 400 degree oven for 15 minutes.  (20 would have worked, too, and it would have been a bit crispier on the bottom)

IMG_6055

While that was baking, I mixed 3 eggs, 1 teaspoon dried, minced onion, 1/4 cup 1/2 and 1/2 (milk works) and a little bit more salt and pepper (probably 1/4 teaspoon each).  This is the filling.  If you want more eggs, you can add in 2-3 more eggs without changing the basic recipe much, and there is room in the pie dish for them.  I also got my toppings ready.

Toppings:  Today, I used turkey ham bits (about 3 Tablespoons) and cheese(1/4-1/2 cup).  In the past, I’ve used so many different things.  Here is a list of things I’ve used at times:  cooked spinach, cooked Swiss chard, cooked broccoli bits, ham pieces, bacon bits, leftover taco meat, parmesan cheese, mozzarella cheese, any other cheese I had laying around—basically any leftover that I thought would taste good on there.  The key is to not put much of anything odd or strong-flavored on it, or the kids won’t eat it:). Small bits–no problem!

When I removed the crust from the oven, I poured the filling into the crust, and than added the toppings and popped it right back into the oven.

I baked that for 15 additional minutes in the 400 degree oven.  Then, we were ready for breakfast.  If you have added more filling, or lots of cold leftovers, you may need to cook a bit longer, say 20 minutes.  You want the filling to set.  This pie serves around 6 and can be made ahead and reheated one slice at a time, as needed.

IMG_6059

We enjoyed it with home-canned pears.  It is tasty and economical, especially with egg prices as low as they are right now!

Gluten-Free Double Chocolate Loaf Cake

IMG_5761

I’ve been asked for the recipe for the cake I made for my sister’s birthday last week.  It’s a recipe from an old cookbook that I altered to make gluten-free.  Here’s what I did:

1-1/2 cup butter

3 cups sugar

5 eggs

3 cups Bob’s Red Mill 1-1 gluten-free flour (this blend includes xanthum gum)

1/2 cup cocoa powder

1/2 teaspoon baking powder

1/2 teaspoon salt

1 cup milk

1 teaspoon vanilla

chocolate chips to sprinkle on top (I think I used about 1 cup)

Soften the butter.  Cream butter and sugar, add eggs.  Add the rest of the ingredients, except the chocolate chips and mix well.  (I did all of this in a bowl, with a spoon, but I’m sure a mixer could be used.)  Divide the mixture between 3 loaf pans that have been sprayed with non-stick spray.  (I’ve done it in 2 large loaf pans, or 3 slightly smaller ones, and feel it cooks better in the 3 slightly smaller ones.  I also made cupcakes from this recipe last spring–just cook for less time and leave the chocolate chips off or stir them in)  Sprinkle chocolate chips on top of the loaf cakes and bake them in a 350 degree oven for 1 hour-1 hour and 10 minutes or until firmed up and done in the center.  (The trick here is to get the center to cook without getting the edges too crisp or even burnt.)  Cool on a wire rack for 10 minutes, then turn out of the pans and finish cooling.  Makes 2 large loaves or 3 smaller ones.

IMG_5798

There are several things I like about this recipe.  First, it does not need frosting, so it is easy to transport. Second, it can be divided into the individual loaves so I can make a batch, use one loaf and freeze the rest for another day, which is a time-saver for me.  Third, it is gluten-free and tastes really good!  It can be “dressed up” for a party, or used for lunches.

If you don’t need to make gluten-free cake, it works well with regular flour.  I used to make it that way, years ago.  It is basically a chocolate pound cake with chocolate chips sprinkled on top.  When I modified the recipe, I did add more cocoa powder than the original recipe, because……chocolate cake, chocolate chips, chocolate candy bars….need I say more?  Enjoy!

IMG_5774

IMG_4635

Gluten-Free Cashew Chicken

IMG_4904

I found the recipe for cashew chicken that I promised to post.  I made it for dinner tonight and remembered why I loved it so much.  So, here’s to Jeannie–cashew chicken over rice

I started with a recipe from Taste of Home, and have changed it up over the years.  Here’s what I did today.  This recipe is very flexible.

Mix:  2 cups chicken or turkey broth

1/4 cup cornstarch

3 Tablespoons gluten-free soy sauce (we buy it by the gallon at Cash and Carry)

1/2 teaspoon ground ginger

Stir those ingredients together, and set aside.  This is the sauce that gives the stir-fry a great flavor.  Stir it one more time right before pouring it over the veggie/meat mixture.

Cut up vegetables and chicken and put into bowls, piles on a cutting board, whatever you want.  It just works better to have it all cut up before you start.  You can vary the veggies according to what you can grow, or get on sale.  Today I used:

2 boneless, skinless chicken thighs cut into very small pieces (Mine were diced into about 1/4-1/3 inch pieces)

1/2 medium onion, diced

1 carrot, diced

Celery sliced thinnly (today it was the center of a stalk that needed used, other times I might  use 2-3 sticks)

4 large mushrooms

1 cup snow peas ( I would have liked 2 cups in there, but that’s what I had today)

1 bunch broccoli, cut into flowerets (it was 1 medium-sized bunch)  I also cut the stem into small pieces and added that in.

2 cloves garlic, minced

IMG_4903


I put a small bit of oil into a frying pan and cooked the chicken and onion for about 4-5 minutes, until the chicken was looking almost done.  Then, I added a little more liquid (some of the mix I made above, or plain broth.  If you use the mix, take from the top so you don’t get any cornstarch at this point.)  Then, I added the veggies in the order of hardest first, and softest (or anything that needed to stay crisper)last.  So, today I had carrots, celery, broccoli, mushrooms, snow peas and minced garlic.  If you have a different assortment, it will work.  Others I like in there are zucchini and summer squash, peas, and bean sprouts, to name a few.  The sauce is very important and it gives any veggies that great flavor.   I let it cook for a bit, stirring often.   After the veggies were crisp, but getting tender, I poured in the mixture.  I continued cooking and frequently stirring until the mixture thickened.  I did not let the veggies get very soft, just crisp-tender, because that is how my family likes them.

I made white rice to go with this, and it sopped up the marvelous sauce nicely.  I sprinkled some cashews on top of each portion after it was plated.  This would have been enough for 4 normal people, but 3 of us very hungry people ate it all.  It would be easy to stretch this, by adding more veggies.  It is tasty and healthy.


Zucchini Noodle Spaghetti

IMG_4349

I made a great low-carb recipe the other day for lunch.  It was quick, easy, and tasty!

Here’s what I did:

I took my hand-held, inexpensive, veggie noodle maker and twisted a zucchini through the wider side.  I wanted some “noodles” that were thicker, so they would not mush up on me.

I put a little butter in a frying pan, melted it, then added the “noodles” and sprinkled it liberally with garlic-salt.  The kind I use is a grinder, so I twisted the top several times to get a good amount of garlic and salt on the “noodles.”  Then I cooked the zucchini noodles for about 3 minutes, stirring only when necessary because I didn’t want to break them up.

IMG_4348

In the meanwhile, I took 3 of the meatballs I had made the other day and warmed them in the microwave with a little marinara sauce.

I put the meatballs and sauce on the zucchini noodles, sprinkled it with Parmesan cheese (more than I intended since a lump came rushing out), and enjoyed my lunch very much.

Gluten-Free Lemon Poppyseed Muffins

img_4067

A reader asked me to post a good muffin recipe. Of the muffins we have made lately, we liked this one the best.  I started with a recipe I used to use frequently before I needed to go gluten-free.  Ja’Ana made it as it was, substituting gluten-free flour for the all-purpose flour.  It was quite dry.  Today, we tweaked that recipe quite a bit, and are much happier with the results.  Here’s what we did:

Dry ingredients (mix together in a large bowl):

1-3/4 cup Bob’s Red Mill 1-1 gluten-free flour blend

1/2 cup sugar

2 Tablespoons poppy seeds

grated lemon peel from 1 lemon

1 Tablespoon baking powder

1/2 teaspoon baking soda

1/2 teaspoon salt

Wet ingredients (mix together in a small bowl):

1/2 cup milk

1/3 cup oil

1 container (6 oz) lemon yogurt (about 2/3 cup)

2 eggs

Stir the dry ingredients together until mixed.  Make a small well in the center of the dry ingredients.  Beat the wet ingredients together and then pour them into the well in the center of the dry ingredients.  Mix together.  Put into 12 muffin cups that have been lined with cupcake wrappers or sprayed with non-stick spray.  Bake in 350 degree oven for 16-20 minutes, until golden brown.  Remove muffins from pans and place on a cooling wrack.  Make lemon glaze and drizzle on top of warm muffins if desired.  We have eaten them many times without glaze. Let them continue to cool until completely cooled.  Freeze any muffins you are not going to use immediately, then remove from freezer, thaw on counter or in microwave,  and enjoy.  Makes 12 muffins.

Lemon Glaze:

1/2 cup powdered sugar

2-3 teaspoons lemon juice (I just squeezed juice out of the lemon I used for the lemon peeling until a nice consistency was reached)

Stir powdered sugar and lemon juice together until the glaze is able to be drizzled on to the muffins.  Start with a small amount of juice and add more until desired consistency is reached.  If you put in too much juice and it is so runny and just slides off the muffins, add a little more powdered sugar until it thickens up slightly.  If you have to spread it like frosting, it is too thick and you need to add more juice.

img_4066